Using ipv6 in cloud
| This site replaces the former Compute Canada documentation site, and is now being managed by the Digital Research Alliance of Canada. Ce site remplace l'ancien site de documentation de Calcul Canada et est maintenant géré par l'Alliance de recherche numérique du Canada. |
IPv6 in Arbutus Cloud
IPv6 Link-Local (LLA) and Global Unicast Addresses (GUA) are generally available within the Arbutus cloud environment.
GUA can be set up via a separate interface, which in turn also handles only the IPv6 traffic.
Addresses are being set up using Stateless Address Auto Configuration (SLAAC), which automatically sets up the IP on the VM interface. By default, the security group rules will allow all outbound traffic from the VM via the IPv6 GUA, but no traffic that originates from outside the VM will be allowed until specific security group rules have been defined. This is the same behaviour as IPv4.
Example of an openstack cli configuration
Get the ID of the VM to attach the network interface.
openstack server list
+--------------------------------------+-----------------+---------+-----------------------------------------------+----------------------------------+----------+
| ID                                   | Name            | Status  | Networks                                      | Image                            | Flavor   |
+--------------------------------------+-----------------+---------+-----------------------------------------------+----------------------------------+----------+
| 74be352d-19ca-46cc-9661-7088d2652e34 | test            | ACTIVE  | def-bott-network=192.168.27.140, 206.12.93.29 | Debian-10.9.2-Buster-x64-2021-05 | p1-1.5gb |
+--------------------------------------+-----------------+---------+-----------------------------------------------+----------------------------------+----------+
Assign a new network interface to the VM, using IPv6 as network.
openstack server add network 74be352d-19ca-46cc-9661-7088d2652e34 IPv6-GUA
Check the status of the assignment.
openstack server list
+--------------------------------------+-----------------+---------+------------------------------------------------------------------------------------------------+----------------------------------+----------+
| ID                                   | Name            | Status  | Networks                                                                                       | Image                            | Flavor   |
+--------------------------------------+-----------------+---------+------------------------------------------------------------------------------------------------+----------------------------------+----------+
| 74be352d-19ca-46cc-9661-7088d2652e34 | test            | ACTIVE  | IPv6-GUA=2607:f8f0:c11:7004:f816:3eff:fef1:8cee; def-bott-network=192.168.27.140, 206.12.93.29 | Debian-10.9.2-Buster-x64-2021-05 | p1-1.5gb |
+--------------------------------------+-----------------+---------+------------------------------------------------------------------------------------------------+----------------------------------+----------+
Example of a Webinterface configuration
Log in to the dashboard and go to the Instances menu, click on Attach Interface, which will open a dialog. Use IPv6-GUA (2607:f8f0:c11:7004::/64) from the network menu and click on Attach.

1. Dashboard showing instances

2. Drop-down menu to attach an interface
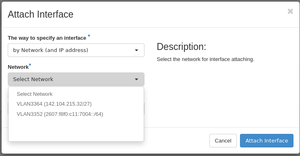
3. Available networks menu

4. Show the second IPv6 interface


The shown IPv6 address is now available and can be used until the interface is detached. Every time the interface is detached, the GUA is released and put back into the pool and thus, can be used by anyone else. Rebuilding or restarting the VM however, will not release the GUA.
Access from any IPv6 GUA can be granted via Security Groups in OpenStack; the only difference is the CIDR which automatically detects the address type.

Example of a Linux configuration
The OpenStack network you configured above will appear in Linux as an additional eth-type interface. In most cases, /dev/eth0 will be your existing interface. In most cases, your new IPv6 enabled interface will be /dev/eth1. The easiest way to pick-up your new device is to reboot. But first, check to confirm that IPv6 is enabled with this command
sudo sysctl -a | grep ipv6.*disable
The output should all end in zeros. IPv6 enabled is the default in all recent images. Any kernel parameters that need to be changed to zero should be added to /etc/sysctl.conf.
Also, add the following kernel parameters in /etc/sysctl.conf.
net.ipv6.conf.eth1.forwarding=0
net.ipv6.conf.eth1.accept_ra=1
Reboot your system and confirm IPv6 is enabled and that /dev/eth1 exists.
Next, add the following configurations to /etc/sysconfig/network-scripts/ifcfg-eth1
IPV6INIT=yes
IPV6_AUTOCONF=yes
IPV6_DEFROUTE=yes
IPV6_FAILURE_FATAL=no
Reboot your system again. The /dev/eth1 interface should be configured and ready to be used.
You may then confirm the IPv6 configuration with
$ ip -6 address
Finally, confirm that IPv6 is working with
$ ping6 -c 1 www.google.com
That's all. Congratulations. Your system is now configured to use IPv6.
Further reading
- From RedHat, What you need to know about IPv6
- From RedHat, Configuring an IPv6 address in Red Hat Enterprise Linux 7 and 8
- From OpenStack, IPv6