Cloud Quick Start
| This site replaces the former Compute Canada documentation site, and is now being managed by the Digital Research Alliance of Canada. Ce site remplace l'ancien site de documentation de Calcul Canada et est maintenant géré par l'Alliance de recherche numérique du Canada. |
Parent page: Cloud
Before you start
- Have a cloud project
You cannot access a cloud without first having a cloud project. If you don't already have a cloud project, see Getting a cloud project. Once a cloud project is associated with your account, you will receive a confirmation email which will have important details you will need to access your project and get started with the cloud. Make sure you have this confirmation email ready. - Have a compatible browser
The web interface for accessing your cloud project works well with both the Firefox and Chrome web browsers. Other browsers may also work, however some have shown the error messageDanger: There was an error submitting the form. Please try again.which suggests that your browser is not supported by our system. This error message was noticed with certain versions of the Safari web browser on Macs; upgrading Safari may help, but we recommend that you use Firefox or Chrome. If you are still having issues, email technical support.
Creating your first virtual machine
Your project will allow you to create virtual machines (also referred to as instances or VMs) stored on the cloud, which you can access from your personal computer using our web interface.
- Log in to the cloud interface to access your project
The confirmation email you received includes a link to the cloud interface your project is associated with. Click on this link to open your project in your default web browser. If your default web browser is not compatible, open a compatible web browser and copy and paste the link address into the browser. If you know the name of your associated cloud, but don't have the login URL see using the cloud for the list of cloud interface URLs at which you can log in. Use your username (not your email address) and password to log in. - Check your OpenStack dashboard
After logging on to the cloud interface (the platform is called OpenStack) you will see a dashboard that shows an overview of all the resources available in your project. If you want to know more about navigating and understanding your OpenStack dashboard read the official OpenStack documentation.
Below there are instructions on starting a Windows VM or a Linux VM, depending on which tab you select. Remember this is the operating system for the virtual machine or instance you are creating, not the operating system of the physical computer you are using to connect. It should be clear from your project pre-planning whether you will be using Linux or Windows for your VM operating system, but if you are unsure please email technical support.
SSH key pair
When you create a virtual machine, password authentication is disabled for security reasons.
Instead, OpenStack creates your VM with one SSH (Secure Shell) public key installed, and you can only log in using this SSH key pair. If you have used SSH keys before, the SSH public key can come from a key pair which you have already created on some other machine. In this case follow the instructions below for Importing an existing key pair. If you have not used SSH key pairs before or don't currently have a pair you want to use, you will need to create a key pair. If you are using a windows machine see the Generating SSH keys in Windows page, otherwise follow the Linux/Mac instructions. For more information on creating and managing your key pairs see the SSH Keys page in our wiki.
Importing an existing key pair
- On the OpenStack left menu, select Compute->Key Pairs.
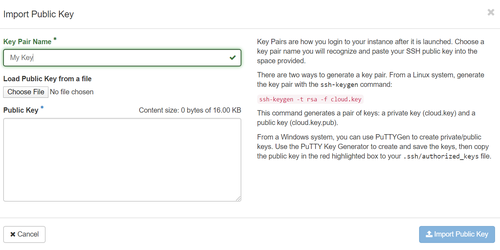
- Click on the Import Public Key button; the Import Public Key window is displayed.
- Name your key pair.
- Paste your public key (only RSA type SSH keys are currently supported).
Ensure your pasted public key contains no newline or space characters. - Click on the Import Public Key button.
It is not advised to create key pairs in OpenStack because they are not created with a passphrase which creates security issues
Launching a VM
To create a virtual machine, select Compute->Instances on the left menu, then click on the Launch Instance button.
A form is displayed where you define your virtual machine. If you have a plan for the exact specifications your VM needs through your pre-planning, feel free to use those specifications. Otherwise, you can follow along with this example for a fairly generic easy way to use Linux VM. The Launch Instance window has the following options:
- Details
- Instance Name: Enter a name for your virtual machine. Do not include spaces or special characters in your instance name. For more details on naming rules see restrictions on valid host names.
- Description: This field is optional.
- Availability Zone: The default is Any Availability Zone; do not change this.
- Count: This indicates the number of virtual machines to create. Unless you have specifically planned for multiple machines leave this set at 1.
- Source
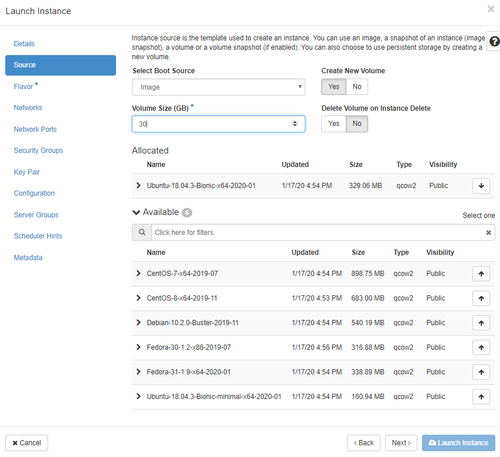
- Select Boot Source: Because it's your first VM, select Image as the boot source. For information about other options see Booting from a volume.
- Create New Volume: Click Yes; your VM's data will be stored in the cloud volume (or persistent storage). For more information on volume usage and management see Working with volumes.
- Volume Size (GB): If you have a pre-planned volume size use that, otherwise 30 GB is reasonable for the operating system and some modest data needs. For more information on volume usage and management see Working with volumes.
- Delete Volume on Instance Delete: Click on No to help prevent your volume from being deleted accidentally; however, if you are confident you always want your volume deleted when your instance is deleted, click on Yes.
- Allocated and Available lists: The list at the bottom of the window shows the available images your VM can boot. For a beginner on Linux, we recommend the most recent Ubuntu image, but if you prefer you can choose any one of the other Linux operating systems. To select an image click on the upwards pointing arrow on the far right of the row containing your desired image. That row should now show up in the Allocated list above. It is important for later to remember which image you chose (ex. Ubuntu, Fedora, etc.).
- Flavor
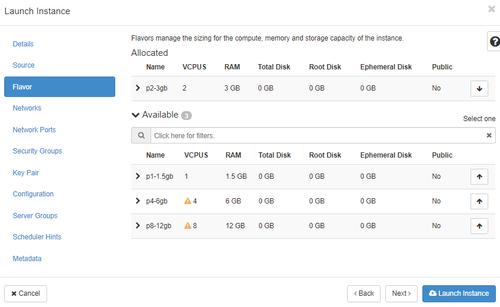
- Allocated and Available lists: The flavor determines what type of hardware is used for your VM, which determines how much memory and processing capabilities it has. The Available list shows all the flavors available for your chosen boot image. Click on the > icon at the far left of a row to see how that particular flavor matches up with what you have been allocated for your project. If there is an alert icon on one of the specifications, that means that your project doesn't have enough of that resource to support that flavor. Choose a flavor that your project can support (i.e. doesn't issue an alert) and click on the upwards arrow on the far right of that row. That flavor should now show up in the Allocated list. For more details, see Virtual machine flavors.
- Allocated and Available lists: The flavor determines what type of hardware is used for your VM, which determines how much memory and processing capabilities it has. The Available list shows all the flavors available for your chosen boot image. Click on the > icon at the far left of a row to see how that particular flavor matches up with what you have been allocated for your project. If there is an alert icon on one of the specifications, that means that your project doesn't have enough of that resource to support that flavor. Choose a flavor that your project can support (i.e. doesn't issue an alert) and click on the upwards arrow on the far right of that row. That flavor should now show up in the Allocated list. For more details, see Virtual machine flavors.
- Networks: Do not change this unless required. On Arbutus, select your project network by default (usually starting with def-project-name).
- Network Ports: Do not change this now.
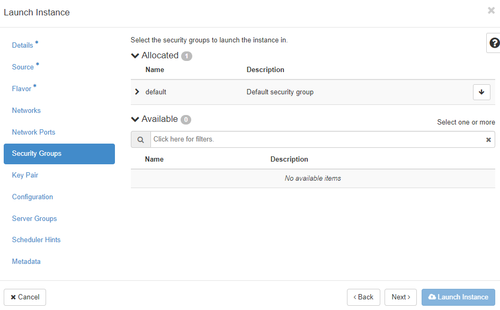
- Security Groups: The default security group should be in the Allocated list. If it is not, move it from Available to Allocated using the upwards arrow located on the far right of the group's row. For more information see Security Groups.
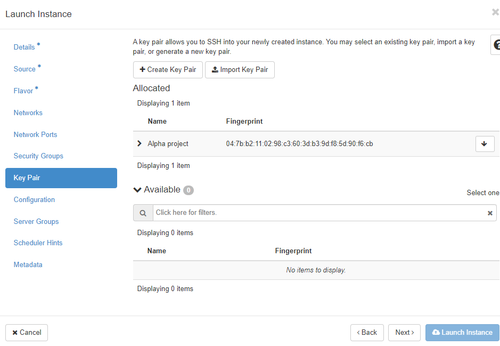
- Key Pair: From the Available list, select the SSH key pair you created earlier by clicking the upwards arrow on the far right of its row. If you do not have a key pair, you can create or import one from this window using the buttons at the top of the window (please see above). For more detailed information on managing and using key pairs see SSH Keys.
- Configuration: Do not change this now. For more information on customization scripts see Using CloudInit.
- Server Groups: Do not change this now.
- Scheduler Hints: Do not change this now.
- Metadata: Do not change this now.
Once you have reviewed all the options and defined your virtual machine, click on the Launch Instance button and your virtual machine will be created. The list of instances will be displayed and the Task' field will show the current task for the VM; it will likely be Spawning initially. Once the VM has spawned, it will have the power state of Running; this may take a few minutes.
Network settings
On the Instances page is a list of VMs with their IP address(es) displayed in the IP Address column. Each VM will have at least one private IP address, but some may also have a second public IP assigned to it. When your OpenStack project is created, a local network is also created for you. This local network is used to connect VMs to each other and to an internet gateway within that project, allowing them to communicate with each other and the outside world. The private IP address provides inter VM networking but does not allow for connection to the outside world. Any VM created in your project will have a private IP address assigned to it from this network of the form 192.168.X.Y. Public IPs allow outside services and tools to initiate contact with your VM, such as allowing you to connect to your VM via your personal computer to perform administrative tasks or serve up web content. Public IPs can also be pointed to by domain names.
- Assign a public IP address
- Ensure you are still viewing the instances list where you were redirected as your VM launched. If you need to use the navigation panel, select options Compute->Instances on the OpenStack menu.
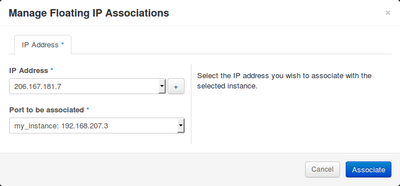
- Click on the drop-down arrow menu (indicated by ▼) on the far right of the row for your VM and select Associate Floating IP, then in the Allocate Floating IP window, click on the Allocate IP button. If this is your first time associating a floating IP, you need to click on the “+” sign in the Manage Floating IP Associations dialog box. If you need to allocate a public IP address for this VM again in the future, you can select one from the list by clicking the ▼ in the IP Address field.
- Click on the Associate button.
- You should now have two IP addresses in your IP address column. One will be of the form
192.168.X.Y, the other is your public IP. You can also find a list of your public IP addresses and their associated projects by going to Network->Floating IPs. You will need your public IP when you are trying to connect to your VM.
- Configure the firewall
- On the OpenStack left menu, select Network->Security Groups.
- On the group row named default, click on the Manage Rules button on the far right.
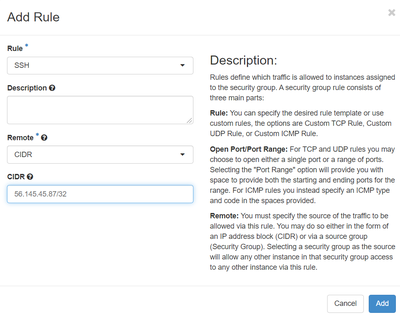
- On the next screen, click on the +Add Rule button near the top right corner.
- In the Rule drop-down menu, select SSH.
- The Remote text box should automatically have CIDR in it; do not change this.
- In the CIDR text box, replace
0.0.0.0/0withyour-ip/32. Note that this is the IP address of the physical computer you are wanting to use to connect to your VM. If you don't know your current IP address, you can see it by going to ipv4.icanhazip.com in your browser. If you want to access your VM from other IPs, you can add more rules with different IP addresses. If you want to specify a range of IP addresses use this tool to calculate your CIDR rule for a range of IP addresses. - Finally, click on the Add button. Now the rule you just created should show up on the list in security groups.
- Important notes
- Do not remove the default security rules as this will affect the ability of your VM to function properly (see Security Groups).
- Security rules cannot be edited, they can only be deleted and re-added. If you make a mistake when creating a security group rule, you need to delete it using the Delete Rule button on the far left of the row for that rule in the security groups screen, and then re-add it correctly from scratch using the +Add Rule button.
- If you change your network location (and therefore your IP address) then you need to add the security rule described in this section for that new IP address. Remember that when you change your physical location (example working on campus vs working from home) you are changing your network location.
- If you do not have a static IP address for the network you are using, remember that it can sometimes change, so if you can no longer connect to your VM after a period of time sometimes it's worth checking to see if your IP address has changed. You can do this by putting ipv4.icanhazip.com in your browser and seeing if it matches what you have in your security rule. If your IP address changes frequently, but the left most numbers always stay the same, it could make more sense to add a range of IP addresses rather than frequently modifying your security rules. Use this tool for determining a CIDR IP range from an IP range or learn more about CIDR notation here.
- It can be helpful to add a description about what a security rule is for (e.g. home or office). That way you will know which rule is no longer needed if you want to add a new rule while connecting, for example, from home.
Connecting to your VM with SSH
In the first step of this quick guide you saved a private key to your computer. Make sure you remember where you saved it because you will need it to connect to your VM. You will also need to remember which type of image you used (Ubuntu, Fedora, etc.) and which public IP address is associated with your VM.
Connecting from a Linux or Mac machine
If the computer you are using to connect to your VM has a Linux or Mac operating system, use the following instructions to connect to your VM. Otherwise skip down to the next section to connect with a Windows computer.
Open a terminal and input the following command:
[name@server ~]$ ssh -i /path/where/your/private/key/is/my_key.key <user name>@<public IP of your server>
where <user name> is the name of the user connecting and <public IP of your VM> is the public IP you associated with your VM in the previous step. The default user name depends on the image.
| Image distribution name | <user name>
|
|---|---|
| Debian | debian |
| Ubuntu | ubuntu |
| CentOS | centos |
| Fedora | fedora |
| AlmaLinux | almalinux |
| Rocky | rocky |
These default users have full sudo privileges. Connecting directly to the root account via SSH is disabled.
Connecting from a Windows machine
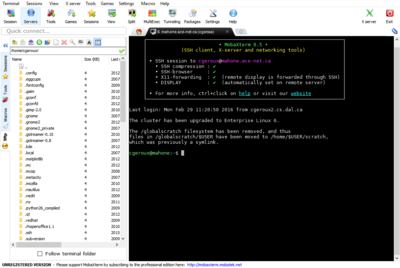
If you want to use a Windows computer to connect to your VM, you will need to have an interface application to handle the SSH connection. We recommend MobaXTerm, and will show the instructions for connecting with MobaXTerm below. If you want to connect using PuTTY instead, see Connecting with PuTTY.
To download MobaXterm click here. To connect to your VM using MobaXterm follow these instructions:
- Open the MobaXterm application.
- Click on Sessions then press New session.
- Select an SSH session.
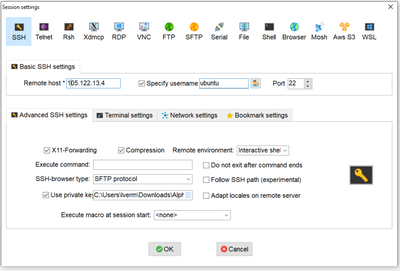
- Enter the public IP address for your VM in the Remote host address field.
- Ensure that the Specify username checkbox is checked, then enter the image type for your VM (ubuntu for example) into the username field, all lowercase.
- Click on the Advanced SSH settings tab, and check the Use private key checkbox.
- Click on the page icon in the far right of the Use private key field. In the pop-up dialogue box select the key pair (.pem file) that you saved to your computer at the beginning of this quick guide.
- Then click on OK. MobaXterm will then save that session information you just entered for future connections, and also open an SSH connection to your VM. It also opens an SFTP connection which allows you to transfer files to and from your VM using drag-and-drop via the left-hand panel.
Where to go from here
- Learn about using the Linux command line in your VM
- Learn about security considerations when running a VM
- See configuring a data or web server
- Learn more about working with OpenStack
- Cloud Technical Glossary
- Automating VM creation
- Backing up your VM
- For questions about our cloud service, email technical support.
Request access to a Windows image
To create a Windows VM on one of our clouds you must first request access to a Windows image by emailing technical support.
You will be provided access to a Windows Server 2012 Evaluation image and a username to use when connecting. The evaluation period is 180 days. It may be possible to apply a Windows license to a running VM created from this evaluation image, however we do not provide these licenses.
SSH key pair
Windows VMs encrypt the administrative account password with a public key. The matching private key decrypts the password.
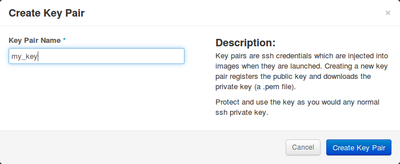
We recommend creating a new key pair within the OpenStack dashboard rather than importing an existing key pair. To create a new key pairː
- Click on Access & Security from the left menu.
- Select the Key Pairs tab.
- Click on
 ; the Create Key Pair window is displayed.
 - Give your key pair a name.
- Click Create Key Pair button.
- Save the <key name>.pem file on your local drive.
If you would like to use an existing key pair with your Windows VM see the comments on key pairs below.
Launching a VM
To create a virtual machine, click on the Instances menu item on the left, then click on ![]()
A form is displayed where you define your virtual machine.
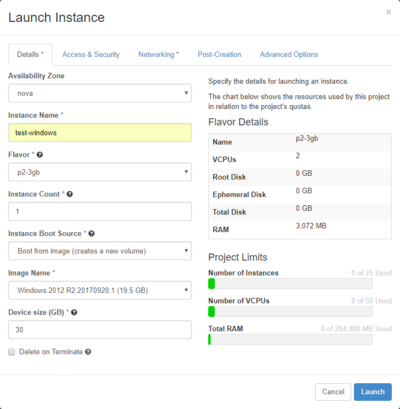
- Details tab
- Availability Zone: There is only one zone; do not change its name.
- Instance Name: Enter a name for your virtual machine. For details on naming rules see restrictions on valid host names.
- Flavor: The flavor defines virtual machine hardware specifications; choose the 'p2-3gb' flavor.
The Windows image is quite large and requires a large bootable drive. C-flavors, as described here, only have root drives of 20 GB, choosing a "p" flavor allows for larger root volumes. The smallest "p" flavor has 1.5 GB of RAM and from experience this is too little to run Windows well. Choosing a slightly larger flavor, such as "p2-3gb", improves the performance of the VM.
- Instance Count: Number of virtual machines to create.
- Instance Boot Source: What source should be used to boot the VM; choose Boot from Image (creates new volume).
- Image Name: select the Windows image name you were provided.
- Device Size: The size of the root drive; enter 30GB or more.
The final operating system occupies approximately 20 GB of space, though more is needed during setup.
- Delete on Terminate: If this box is checked the volume that is created with the VM will be deleted when the VM is terminated.
It is generally recommended not to check this box as the volume can be deleted manually if desired and allows the VM to be terminated without deleting the volume.
- Project Limits: The green bars reflect the fraction of your available resources that will be consumed by the VM you are about to launch. If the bars become red, the flavor chosen will consume more resources than your project has available. Blue bars indicate any existing resources your project may be using.
- Access & Security tab
- Key pair: Select your SSH key pair.
If you have only one, it is selected by default. If you do not have a key pair, please see above.
- Security Groups: Ensure the default security group is checked.
- Key pair: Select your SSH key pair.
- Networking tab: Do not change this now. Networking will be discussed later, after you have launched a virtual machine.
- Post-Creation tab: Do not change this now.
- Advanced Options tab: Leave Disk Partition on Automatic for now.
Once you have reviewed all the tabs and defined your virtual machine, click on the Launch button and your virtual machine will be created. The Instances list will be displayed and the Task field will show the current task for the VM; it will likely be "Block Device Mapping" initially. Once the VM has spawned and beginning to boot, it will have the Power State of "Running". It will likely take 10+ minutes to finish creating the volume and coping the image to it before beginning to boot.
Locality settings and license agreement
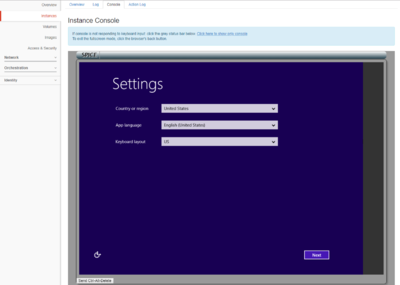
When the VM first boots it will not finish booting until location, language, and keyboard settings are selected and you agree to the license using the console built into the OpenStack dashboard.
To get to the console:
- Go to Instances on the left hand menu.
- Click on the Instance Name of your Windows VM.
- Click on the Console tab to display the Instance Console and wait until you see a Settings screen as shown in the figure to the right.
If you waited a significant amount of time the console screen may have gone into a screensaver mode (blank/black screen). If this is case, click on the blank/black screen so that it gains focus and if necessary press a key on your keyboard to wake it up.
The console mouse pointer often lags behind the actual mouse pointer location. You can either try to account for the lag or use keyboard shortcuts when the console screen has focus.
- The tab key will select different fields.
- The up and down arrows will select different options.
- Under the Country or region drop down menu, letter keys move to the top of the countries beginning with that letter.
- Finally press the tab key until the next box is selected then press the enter key.
You will then be presented with a request to accept the terms and conditions of the license agreement.
- Press the tab key until the I accept box is highlighted.
- Press the enter key.
At this point your VM will restart. Once it finishes restarting the Console will display a sign in screen with the current (UTC) time and date.
Network
On the Instances page is a list VMs with their IP address(es) displayed in the IP Address column. Each VM will have at least one private IP address, but some may also have a second public IP assigned to it.
Private IP
When your OpenStack project is created a local network is also created for you. This local network is used to connect VMs within that project allowing them to communicate with each other and the outside world. Their private IP address does not allow the outside world to reference that VM. Any VM created in your project will have a private IP address assigned to it from this network of the form 192.168.X.Y.
Public IP
Public IPs allow outside services and tools to initiate contact with your VM, such as allowing you to connecting to it to perform administrative tasks or serve up web content. Public IPs can also be pointed to by domain names.
To assign a public IP to a VM, you need to select Associate Floating IP from the drop-down menu button (indicated by ▼) of the Actions column in the Instances list. If this is your first time associating a floating IP, your project hasn't been assigned an external IP address yet. You need to click on the “+” sign to bring up the Allocate Floating IP dialog box. There is only one pool of public addresses, so the correct pool will already be selected; click on the Allocate IP button. The Manage Floating IP Associations screen is displayed again, indicating the IP address and the port (or VM) to which it will be associated (or more specifically NATted); click on the Associate button.
Firewall, add rules to allow RDP
To connect to your virtual machine using a remote desktop connection client, you will need to allow access for remote desktop protocol (RDP) to your VM.
- On the Security Groups tab, select Access & Security; on the default row, click

- On the next screen, click

- RDP has a predefined rule. Select it in the Rules dropdown menu and leave CIDR under Remote.
- Replace the
0.0.0.0/0in the CIDR text box with<your-ip>/32.If you don't know your current IP address you can see it by going to ipv4.icanhazip.com in your browser. Leaving
0.0.0.0/0will allow anyone to attempt a connection with your VM. You should never allow completely open access with RDP as your VM will be susceptible to brute force attacks. This replacement will restrict RDP access to your VM only from this IP. If you want to allow access from other IPs you can add additional RDP rules with different IP address or you can specify a range of IP addresses by using this tool to calculate your CIDR rule from a range of IP addresses.If you leave RDP open to the world by leaving the
0.0.0.0/0in the CIDR text box, a cloud administrator may revoke access to your VM until the security rule is fixed. - Finally, click the Add button.
Remote desktop connection
To connect to a Windows VM we will use a Remote Desktop Connection client. To connect to your Windows VM you need to supply a floating IP, user name, and password.
Retrieving the password
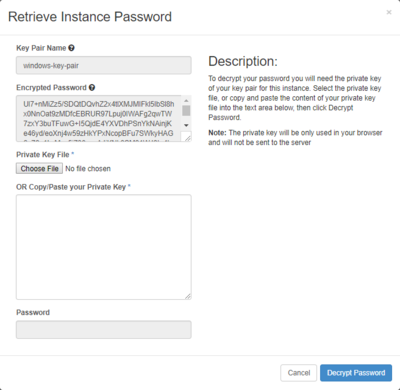
Open the Retrieve Instance Password form:
- Go to Instances on the left menu.
- In the drop down menu next the instance select Retrieve Password.
The password has been encrypted using the public key you selected when creating the VM. To decrypt the password:
- Click the Choose File button and browse to your private key file.
If you followed the steps above in the ssh key section, you should have a private key saved on your local computer with a ".pem" extension which matches the public key.
- Select the key and click Open.
- Click the Decrypt Password button at the bottom left.
Keep this form open as we will use the password in the next step. This process can be repeated later to retrieve the password again.
From a Windows client
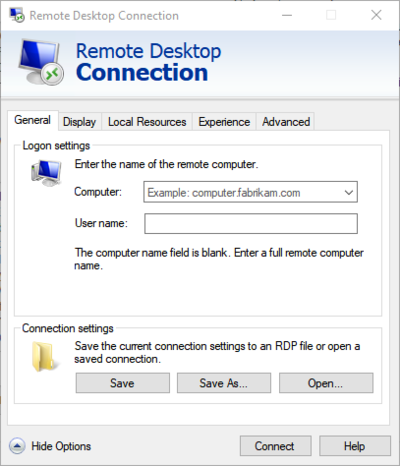
Many Windows systems come with the remote desktop connection tool pre-installed. Try searching for "remote desktop connection" in your Windows system search. If you can not find it, you can go to the Microsoft store and install it. It should be a free installation.
Once you have run the remote desktop connection tool you should see a window similar to the one displayed on the right. To connect to your Windows VM:
- Enter the public IP address next to Computer.
- Add the user name you were provided with in the User name text box.
- Click the Connect button at the bottom.
- Enter the password retrieved in the previous step when prompted.
- Click the OK button.
You will likely be presented with an alert The identity of the remote computer cannot be verified. Do you want to connect anyway?. This is normal click Yes to continue. Once you connect you should see the desktop of your Windows VM displayed within the RDC window.
TODO: The specific certificate error is "The certificate is not from a trusted certifying authority". Is seeing this alert really normal? Do we want to register the Windows image certificate with a signing authority? Could we use letsencrypt or should we just ignore this issue?
From a Linux client
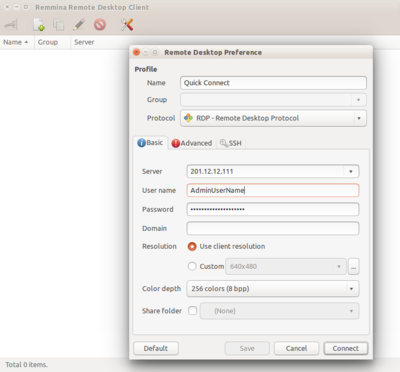
To connect via RDP from Linux you will need a remote desktop client. There are number of different clients out there but the Remmina client appears to work well when tested with Ubuntu. The previous link provides instructions for installing it in Ubuntu, Debian, Fedora and a few other Linux operating systems.
Once you have installed and launched Remmina to connect to your Windows VM:
- Click on Create a new remote desktop file (file with a green '+' sign).
You should see a window similar to that shown on the right.
- Enter the public IP of your Windows VM next to Server.
- Enter the user name you were provided next to User name.
- Enter the password you retrieved in the above step next to Password.
- Click Connect.
From a Mac client
TODO: Anyone with a Mac want to write up this section?
License information
TODO: need to provide information which would be helpful for users to know what path to take to get a license. Should cover things like:
- Where to go to get a license
- What kind of license do I need/what licenses will work on the cloud
- How to apply my license to my existing cloud VM
- How to apply it to a new VM (if that is different than above bullet item)
Comments on key pairs
There are a couple different formats for key files and you can also choose to protect your private keys with passphrases or not. In order to be able to decrypt the Windows VM password your private key must be in OpenSSH format and not have a passphrase. If you created your key pair with OpenStack and downloaded the .pem key file it will already be in the correct format. If you used the ssh-keygen command to create your key pair and didn't specify a passphrase it will also likely be in the correct format. For more general information about key pairs see the SSH Keys page.
An example of an acceptable private key in the OpenSSH format without a passphrase:
BEGIN RSA PRIVATE KEY-----
MIIEowIBAAKCAQEAvMP5ziiOw9b5XMZUphATDZdnbFPCT0TKZwOI9qRNBJmfeLfe
...
DrzXjRpzmTb4D1+wTG1u7ucpY04Q3KHmX11YJxXcykq4l5jRZTKj
-----END RSA PRIVATE KEY-----
The ... in the middle indicates multiple lines of characters similar to those above and below it.
Below are two examples of private keys which will not work with OpenStack with Windows VMs
OpenSSH format with a passphrase:
BEGIN RSA PRIVATE KEY-----
Proc-Type: 4,ENCRYPTED
DEK-Info: DES-EDE3-CBC,CA51DBE454ACC89A

0oXD+6j5aiWIwrNMiGYDqoD0OqlURfKeQhy//FwHuyuithOSI8uwjSUqV9BM9vi1
...
8XaBb/ALqh8zLQOXEUuTstlMWXnhzBWLvu7tob0QN7pI16g3CXuOag==
-----END RSA PRIVATE KEY-----
ssh.com format without a passphrase
BEGIN SSH2 ENCRYPTED PRIVATE KEY ----
Comment: "rsa-key-20171130"
P2/56wAAA+wAAAA3aWYtbW9kbntzaWdue3JzYS1wa2NzMS1zaGExfSxlbmNyeXB0e3JzYS
...
QJX/qgGp0=
---- END SSH2 ENCRYPTED PRIVATE KEY ----
Where to go from here
- learn about security considerations when running a VM
- learn about creating a Linux VM
- learn more about working with OpenStack
- Cloud Technical Glossary
- automating VM creation
- backing up your VM
- For questions about our cloud service, email technical support.
